Learn Authentication The Hard Way: Part Two
This is the second part of a three part series in which we dive into modern application authentication solutions - the hard way.
Part Two: The Hard Way, Continued
Part Three: The Hard Way: Return Of The Specification
The Hard Way, Continued
We are continuing our quest to implement a client that will perform the OpenID Connect Authorization Code Flow. It is one of the two flows we need to know to cover most of our application authentication needs.
Why would we want to do this? Make sure to read Part One for the motivation behind this endeavour.
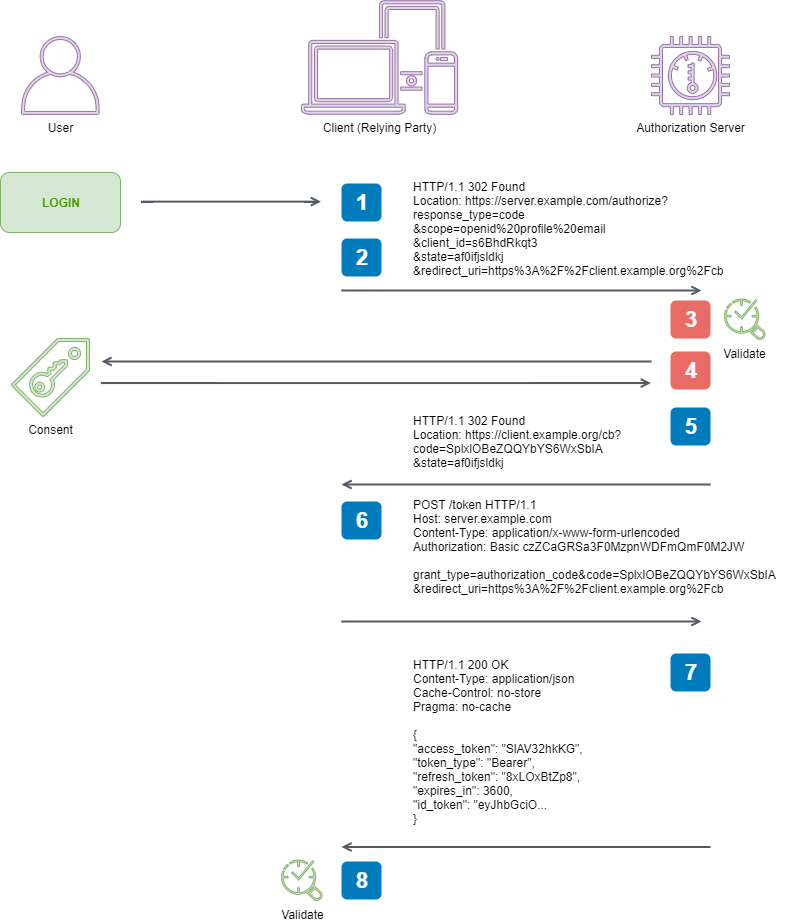
Here are the steps taken from the specification that we are going to facilitate to perform an end-to-end Authorization Code Flow:
1. Client prepares an Authentication Request containing the desired
   request parameters.
2. Client sends the request to the Authorization Server.
3. Authorization Server Authenticates the End-User.
4. Authorization Server obtains End-User Consent/Authorization.
5. Authorization Server sends the End-User back to the Client with an
   Authorization Code.
6. Client requests a response using the Authorization Code at the Token
   Endpoint.
7. Client receives a response that contains an ID Token and Access
   Token in the response body.
8. Client validates the ID token and retrieves the End-User's Subject
   Identifier.
In Part One we managed to implement the first two steps after falling down a spec rabbit-hole. In this post we will continue from the third step.
3. Authorization Server Authenticates the End-User
4. Authorization Server obtains End-User Consent/Authorization
These responsibilities are taken care of by Identity Server 4 for us, and cover 3.1.2.2. Authentication Request Validation - 3.1.2.4. Authorization Server Obtains End-User Consent/Authorization in the Open ID Connect specification.
We won’t dig into these specifications in this post, but it is worth reading them, as these are the things you’ll expect your authentication solution to enforce, and lets you reason about its configuration and expected behaviour.
5. Authorization Server sends the End-User back to the Client with an Authorization Code
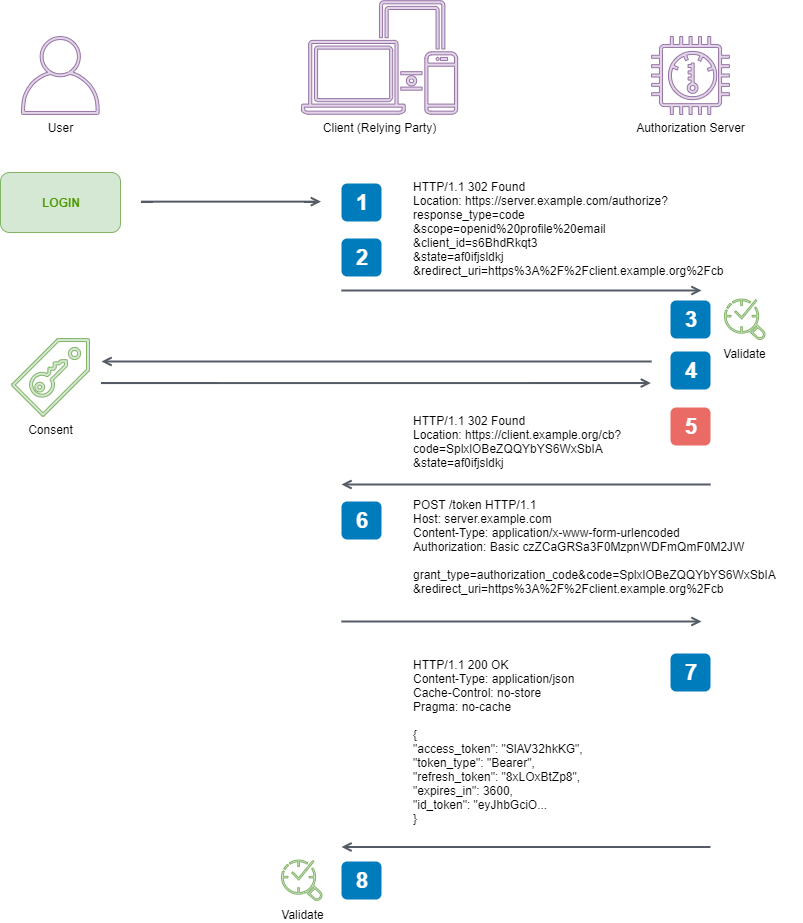
Once we have successfully authenticated with our Authentication Server, it is going to want to send us our Authorization Code - we will exchange this later for identity and access tokens, and optionally a refresh token too. We will start at the OpenID Connect specification
3.1.2.5.  Successful Authentication Response
...
    When using the Authorization Code Flow, the Authorization Response
    MUST return the parameters defined in Section 4.1.2 of OAuth 2.0
    [RFC6749] by adding them as query parameters to the redirect_uri
    specified in the Authorization Request using the
    application/x-www-form-urlencoded format...
And then jump over to RFC 6749 4.1.2
...
For example, the authorization server redirects the user-agent by
sending the following HTTP response:

HTTP/1.1 302 Found
Location: https://client.example.com/cb?code=SplxlOBeZQQYbYS6WxSbIA
        &state=xyz
...
RFC 6749 4.1.2 and 4.1.2.1, along with the OpenID Connect specification 3.1.2.6 define the complete response schema, which can be deserialised into the following model
public class AuthenticationResponse
{
    public string Code { get; set; }
    public string Scope { get; set; }
    public string State { get; set; }
    public string Error { get; set; }
    [FromQuery(Name = "error_description")]
    public string ErrorDescription { get; set; }
    [FromQuery(Name = "error_uri")]
    public string ErrorUri { get; set; }
}
But wait! Just recieving the Authentication Response isn’t all we have to do here, we also need to validate it. Remember our CSRF token? This is where we need to validate it when we recieve it back from the Authentication Server.
3.1.2.7.  Authentication Response Validation
    When using the Authorization Code Flow, the Client MUST validate
    the response according to RFC 6749, especially Sections 4.1.2 and
    10.12.
The following code in our AntiForgeryToken class will complete our token validation mechanism
public static bool IsValid(string token)
{
    var timestampLocation = token.LastIndexOf(':');
    var timestamp = token[^timestampLocation..];

    if (DateTimeOffset.FromUnixTimeSeconds(long.Parse(timestamp)).AddHours(1) < DateTimeOffset.UtcNow)
    {
        throw new InvalidOperationException("Expired");
    }

    return CreateToken(timestamp).Equals(token);
}
Which we can then consume within our redirect endpoint
[HttpGet("authorize")]
// 3.1.2.5.  Successful Authentication Response
// 3.1.2.6.  Authentication Error Response
public async Task<IActionResult> Authorize([FromQuery] AuthenticationResponse response)
{
    // 3.1.2.7.  Authentication Response Validation
    // https://tools.ietf.org/html/rfc6749#section-10.12
    if (AntiForgeryToken.IsValid(response.State) == false)
    {
        return Forbid();
    }
    ...
}
6. Client requests a response using the Authorization Code at the Token Endpoint
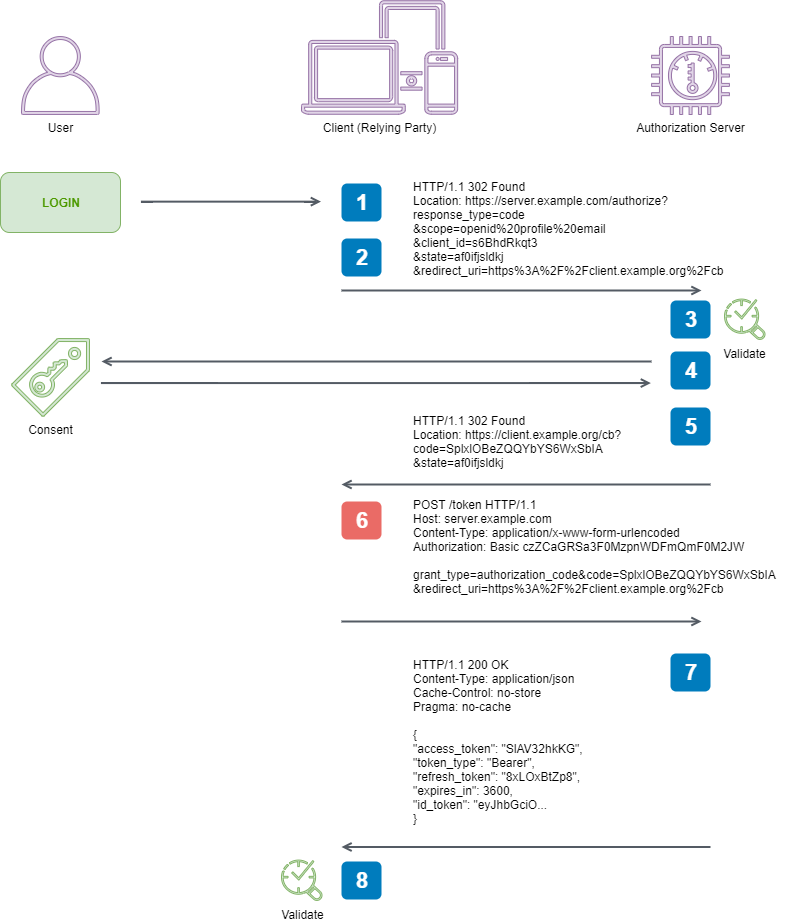
We have now recieved our Authorization Code, and verified the authenticity of our CSRF protection measure. We want to exchange the code for an Access Token, and ID Token. To do this, we need to construct a valid Access Token Request
4.1.3. Access Token Request
...
   grant_type
         REQUIRED.  Value MUST be set to "authorization_code".

   code
         REQUIRED.  The authorization code received from the
         authorization server.

   redirect_uri
         REQUIRED, if the "redirect_uri" parameter was included in the
         authorization request as described in Section 4.1.1, and their
         values MUST be identical.
...
// 3.1.3.1.  Token Request
var requestContent = new List<KeyValuePair<string, string>>()
{
    new KeyValuePair<string, string>("grant_type", "authorization_code"),
    new KeyValuePair<string, string>("code", response.Code),
    new KeyValuePair<string, string>("redirect_uri", "https://localhost:8090/api/authorize")
};
However we are then confronted with this statement
If the Client is a Confidential Client, then it MUST authenticate to
the Token Endpoint using the authentication method registered for
its client_id, as described in Section 9.
🚨 New Term Alert 🚨 Are we a Confidential Client? Since there are two specifications we are working with, and one sits on top of the other, sometimes progressive disclosure fails and we are confronted with a term we haven’t encountered before. If we head over to RFC 6749 and do a quick Ctrl + f for confidential, we discover the following:
2.1. Client Types
...
   confidential
      Clients capable of maintaining the confidentiality of their
      credentials (e.g., client implemented on a secure server with
      restricted access to the client credentials)
...
   web application
      A web application is a confidential client running on a web
      server.  Resource owners access the client via an HTML user
      interface rendered in a user-agent on the device used by the
      resource owner.  The client credentials as well as any access
      token issued to the client are stored on the web server and are
      not exposed to or accessible by the resource owner.
Since we are implementing a Client as a server-side web application (a .NET Core Web API in this case) we are a confidential Client, and therefore MUST implement this.
We have registered a client secret of secret in our Identity Server 4 instance via its Secret support.
As per 9. Client Authentication in the OpenID Connect specification, the default client authentication mechanism is Basic Authentication, which is further supported by 2.3.1. Client Password in RFC 6749. Identity Server will happily support Basic Auth or including these credentials in the POST body. Basic Authentication is a well understood mechanism, so we will use that, but won’t delve into it here beyond looking at the code we will write to apply it to our token endpoint call.
// https://tools.ietf.org/html/rfc6749#section-2.3.1
var authorizationHeader = new AuthenticationHeaderValue("Basic",
    Convert.ToBase64String(Encoding.UTF8.GetBytes("client:secret")));

var client = new HttpClient();
client.DefaultRequestHeaders.Authorization = authorizationHeader;

var result = await client.PostAsync(tokenEndpoint,
    new FormUrlEncodedContent(requestContent));
7. Client receives a response that contains an ID Token and Access Token in the response body
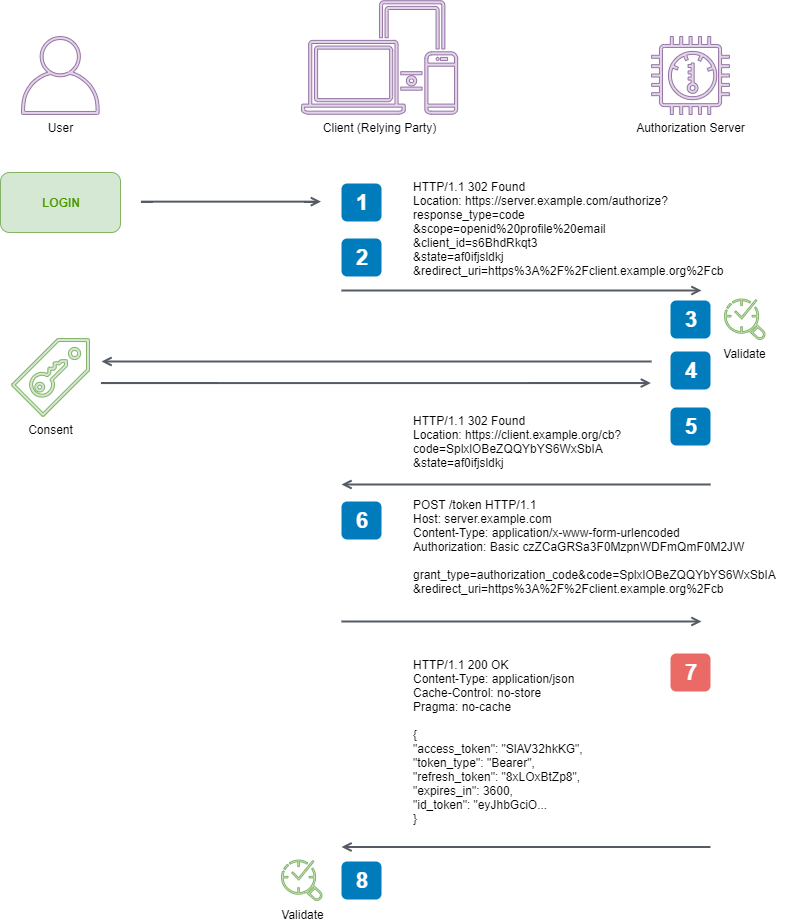
Before this step, the Authorization Server would have performed 3.1.3.2. Token Request Validation and ensured our request to it was well formed and secure.
Now we have supplied the token endpoint of our Authorization Server with our Access Code, it is going to want to return us our ID and Access Tokens, and optionally a Refresh token.
3.1.3.3. Successful Token Response from OpenID Connect, along with 4.1.4. Access Token Response and 5.2. Error Response from RFC 6749 give us our complete object model that we can deserialize responses into.
public class TokenResponse
{
    public string AccessToken { get; set; }
    public string TokenType { get; set; }
    public string RefreshToken { get; set; }
    public int ExpiresIn { get; set; }
    public string IdToken { get; set; }
    public string Error { get; set; }
    [FromQuery(Name = "error_description")]
    public string ErrorDescription { get; set; }
    [FromQuery(Name = "error_uri")]
    public string ErrorUri { get; set; }
}
When we are digging through 3.1.3.3. Successful Token Response we run across this line
3.1.3.3.  Successful Token Response
...
    The OAuth 2.0 token_type response parameter value MUST be Bearer,
    as specified in OAuth 2.0 Bearer Token Usage [RFC6750]
🚨 New Spec Alert 🚨 Does this mean we need to dig into ANOTHER spec in order to ensure our Client implementation is correct? 🙊🙉🙈
It turns out the answer is no. RFC 6750 was originally created to allow for multiple token usage types, with Bearer being the original, and one called “Proof of Possession” to follow. But it never did. It seems even published specifications aren’t immune to just-in-case engineering.
Stay tuned for the final installment, in which we will be shocked to learn how many JW* specifications there are, delve into how crypto is used to make tokens secure, and round out the implementation of our OpenID Connect client!