Learn Authentication The Hard Way: Part One
This is the first part of a three part series in which we dive into modern application authentication solutions - the hard way.
Part Two: The Hard Way, Continued
Part Three: The Hard Way: Return Of The Specification
Introduction
If you are a software developer, security is one of your primary concerns. If you ship code, and that code deals with any sort of sensitive or personal information, you need to ensure your code and the systems you build allow people to transact on your systems safely and securely, free from fear of compromise or consequence. Your user’s security is not Someone Else’s Problem.
The prevailing advice for building secure modern software systems is to not roll your own security mechanisms. I mentioned this in my previous post on securely acessing Azure APIs, but didn’t dwell on the topic. I think it deserves more attention, as there are conflicting pieces of advice here. The first is that we should be responsible for ensuring our systems are secure. The second is that we should delegate security to experts.
These statements sound contradictory, but they don’t have to be. Let’s try and combine them into a statement that reflects their combined intent:
If you are an expert, be responsible for security. If you are not an expert, be accountable for security.
What this means is although we might not hand-craft our own security solutions, we need to take accountability for the solutions we choose to use and integrate, solutions that are produced by experts. To take accountability for these choices, we need to understand these solutions - there is no accountability without understanding.
I’m going to slightly pivot in terminology now, and talk about authentication solutions, as opposed to the more generic sounding security solutions. We are talking software here, and authentication is the primary security mechanism that ensures people can use our systems without fear for privacy or persecution.
Most modern authentication solutions you’ll encounter are built on published standards. Whilst implementations provide their own specific abstractions on top of these standards - if you understand the how and why of the standard, you will have a solid understanding of how the solution will make your solution secure.
The standard to focus on for authentication is OpenID Connect, which supplements and enhances the OAuth 2.0 specification.
These standards are unapproachable at first glance. They read like legal documents - huge tables of context, tonnes of defined terms, dry prose, and formatting straight out of the 1980s. However we musn’t let that deter us - standards are key to us developing our knowledge of how modern authentication solutions work, which will allow us to be accountable when selecting a security solution for our own software.
Seek First To Understand
If you aren’t yet comfortable with the high level concepts involved in modern application authentication, I highly recommend a presentation my good friends Rob Moore and Matt Davies gave at NDC Sydney which provides a top-notch set of metaphors that make the different roles that play a part in the solution easier to grasp.
Once you are comfortable with the high level concepts, there is no avoiding it - we need to read through these specifications. Anyone who has cracked open an RFC before knows that they are not the epitomy of user experience. That being said, there are ways to make them more palatable.
RFCRestyle is a Chrome Extension that formats any *.ietf.org page into a more consumable format - better font usage, colouring (dark mode!), and most awesomely an always-present table of contents that is available to you as you continue down the document.
 😘👌
😘👌
What It Isn’t
This series is not about teaching OpenID Connect / OAuth 2.0 fundamentals. There are a proliferation of great resources on the internet for doing this, like this one from Okta, which happens to reference a number of other fantastic articles on the topic at the end.
This series is not about quantifying why the specifications specify what they do - we aren’t going to dig into why each MUST is a MUST, why some things are OPTIONAL, etc.
This series IS about rolling up our sleeves and getting stuck into the specifications that sit behind modern authentication solutions, developing a comfort in traversing them, and an appreciation for how they can be used to build our knowledge of solutions that implement them.
The Hard Way
I learn best not by reading things, but by doing things. So I thought the best way to embed my knowledge of these standards would be to have a go at implementing them. Not all of them though - I’ll leave that in the capable hands of experts like Dominick Baier and Brock Allen.
What I want to implement is the client component of the solution - this should give me a good understanding of the process flow between my software (the client) and the thing that is responsible for authentication (the server), and the responsibilities of each component in ensuring the user’s security.
More specifically, I’ve chosen to implement a client that will perform the Authorization Code Flow. It is one of the two flows we need to know to cover most of our application authentication needs. We will omit PKCE from our implementation, as we already have a lot of ground to cover implementing the flow. We will mostly adhere to the supplied guidance on what parts of the specification we must implement, but deviate a little at times to ensure we have a well-rounded understanding of the components of the solution.
I will use Dominick and Brock’s fantastic Identity Server 4 to fulfill the server component of the specifications. Identity Server 4 supports a variety of OAuth and OpenID Connect specifications and is OpenID certified, so we can safely assume it will faithfully implement and represent the specifications. Plus it is open source, so if we need to dig into its code at any point to reason about its behaviour - we can!
Prerequisites
I’ve created a sample app that will get us up and running quickly with Identity Server 4 in Docker as the server component of our solution.
I’ll be building my client as a bare-bones ASP.NET Core project - but the code should largely be translatable to any other language and web framework you might want to use.
Implementation
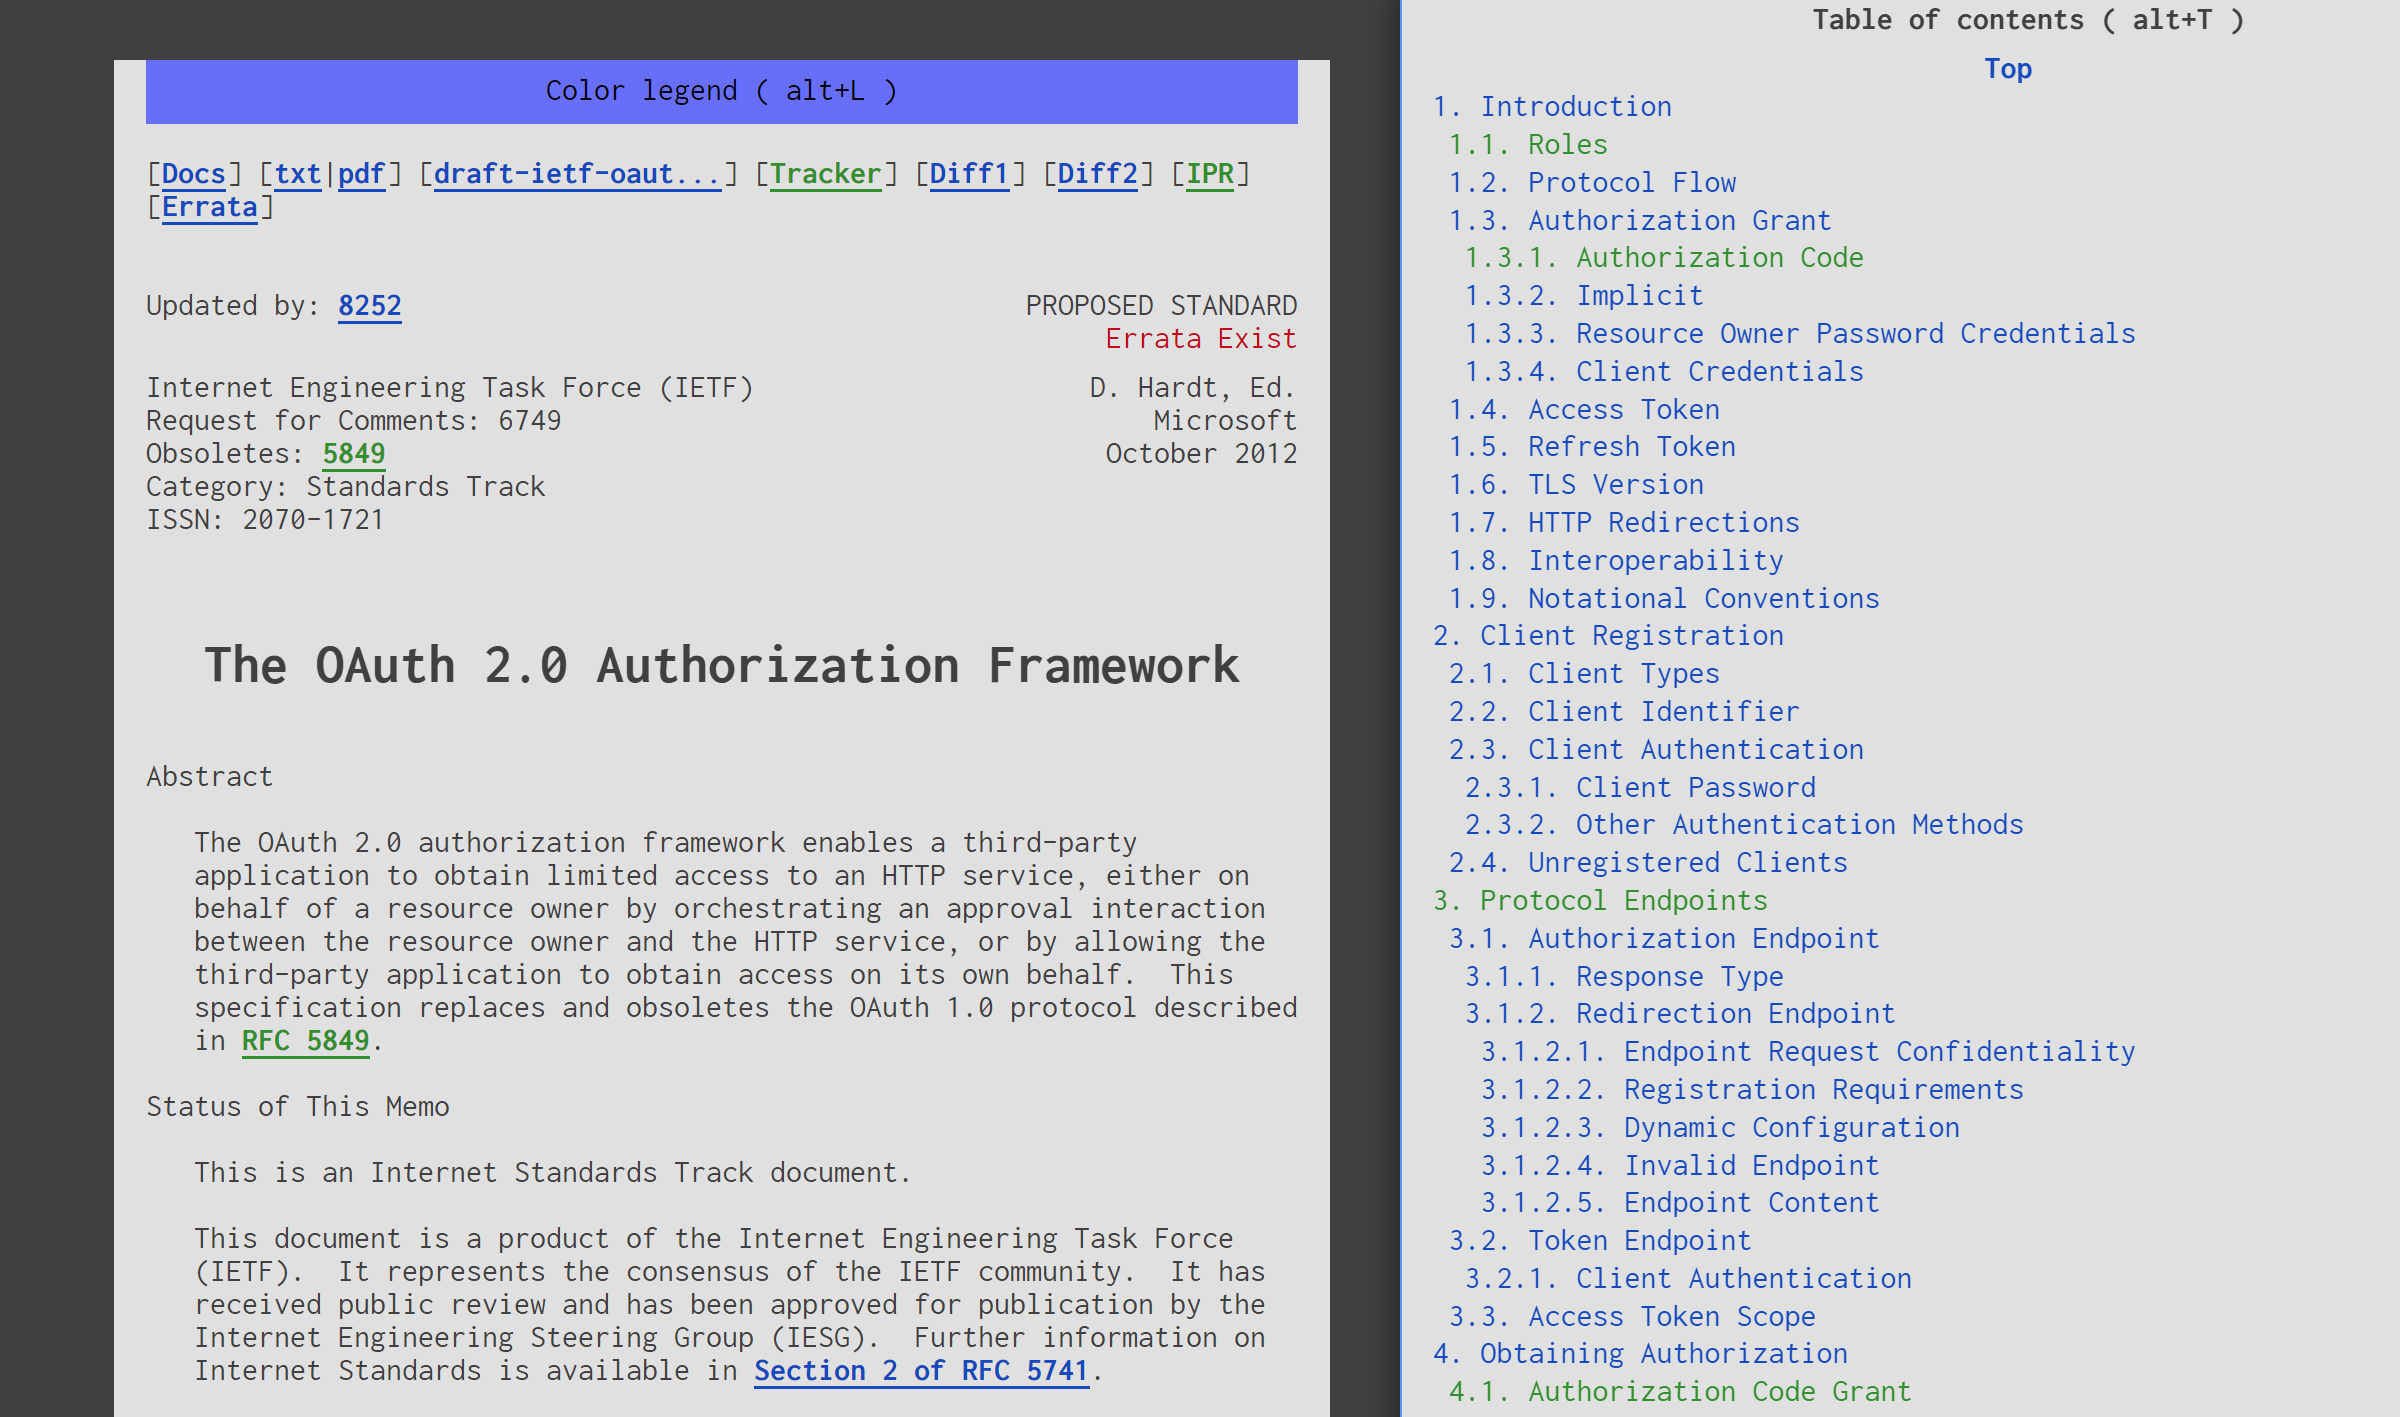
Here are the steps taken from the specification that we are going to facilitate to perform an end-to-end Authorization Code Flow:
1. Client prepares an Authentication Request containing the desired
   request parameters.
2. Client sends the request to the Authorization Server.
3. Authorization Server Authenticates the End-User.
4. Authorization Server obtains End-User Consent/Authorization.
5. Authorization Server sends the End-User back to the Client with an
   Authorization Code.
6. Client requests a response using the Authorization Code at the Token
   Endpoint.
7. Client receives a response that contains an ID Token and Access
   Token in the response body.
8. Client validates the ID token and retrieves the End-User's Subject
   Identifier.
1. Client prepares an Authentication Request containing the desired request parameters
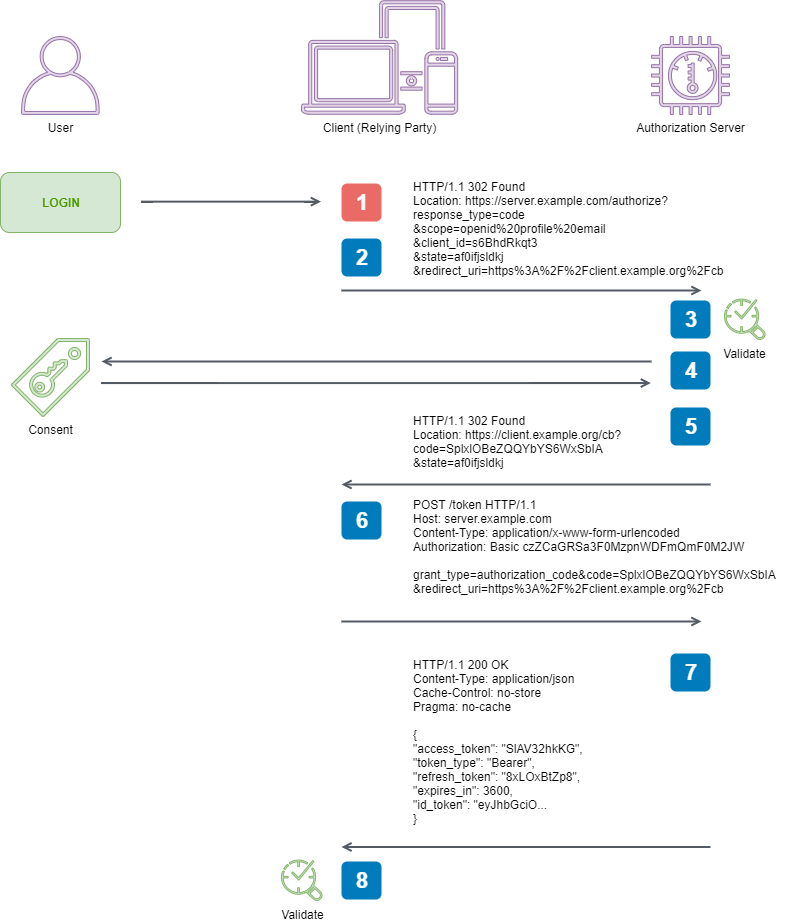
This is the very first step in our process. A user has arrived at our software without any evidence of being authenticated, and our software needs to prepare an Authentication Request to ask the Authorization Server to authenticate them on our behalf.
The spec says we can either use a GET or POST for the interaction, but if we GET, we need to ensure we serialize our query parameters on the query string. We will be using this approach, as it tends to be the ‘standard’ way of doing it.
There are a number of important points contained in the composition of the Authentication Request that I’ll highlight here:
- The
scopeparameter MUST containopenid- without this, we are not using OpenID Connect, and the behaviour of the Authorization Server is entirely unspecified - The
response_typeparameter MUST becode- this is how we tell the Authorization Server what flow we are initiating - We must supply
client_idandredirect_uriparameters - this is how we identify our client to the Authorization Server, and ensure the server only sends our tokens back to us and not any random system requesting them
Composing the request looks like this:
// 3.1.2.1.  Authentication Request
var requestContent =
    "scope=openid%20profile%20email&" +
    "response_type=code&" +
    "client_id=client&" +
    "redirect_uri=https%3A%2F%2Flocalhost%3A8090%2Fapi%2Fauthorize&" +
    $"state={WebUtility.UrlEncode(AntiForgeryToken.GetForCurrentUser())}";
👀 but what is this line about?
$"state={WebUtility.UrlEncode(AntiForgeryToken.GetForCurrentUser())}"This line is the result of a spec rabbit hole. A spec rabbit hole is when you see a seemingly innocuous statement, and then spend the next n hours chasing it through the spec and internet. This particular rabbit hole opens up like so
3.1.2.1.  Authentication Request
...
state
    RECOMMENDED. Opaque value used to maintain state between the
    request and the callback. Typically, Cross-Site Request Forgery
    (CSRF, XSRF) mitigation is done by cryptographically binding the
    value of this parameter with a browser cookie.
This doesn’t really tell us much about how we should go about implementing the CSRF mitigation recommended. If we continue reading, we will come across this shortly after
3.1.2.7.  Authentication Response Validation
    When using the Authorization Code Flow, the Client MUST validate
    the response according to RFC 6749, especially Sections 4.1.2 and
    10.12.
This happens continuously throughout the OpenID Connect specification. Since it sits on top of OAuth 2.0 (RFC 6749), it does not redefine it, but references it at appropriate times. This makes sense, but leads to us needing to jump between the specs to build a complete picture.
If we follow the rabbit hole over to RFC 6749 10.12, we arrive at
10.12. Cross-Site Request Forgery
...
    The client MUST implement CSRF protection for its redirection URI.
    This is typically accomplished by requiring any request sent to the
    redirection URI endpoint to include a value that binds the request
    to the user-agent's authenticated state (e.g., a hash of the
    session cookie used to authenticate the user-agent).

    The client SHOULD utilize the "state" request parameter to deliver
    this value to the authorization server when making an authorization
    request.
...
    The binding value used for CSRF protection MUST contain a
    non-guessable value (as described in Section 10.10)
Quick! Over to 10.10!
10.10. Credentials-Guessing Attacks
...
    The probability of an attacker guessing generated tokens (and other
    credentials not intended for handling by end-users) MUST be less
    than or equal to 2^(-128) and SHOULD be less than or equal to
    2^(-160).
Alrighty then.
This is where the spec leaves us to our own devices to figure out what it is talking about.
What it means in plain-language is that whatever token you use should have at least 128 bits of random information within it, and preferably have at least 160 bits of random information (often called entropy). OWASP supply a nice formula for calculating how long it would take to force a given session identifier by token length.
OWASP also happen to supply some great advice around implementing security mechanisms including CSRF. Let’s use their HMAC based token pattern, and combine that with a SessionId that meets our randomness requirement. That should satisfy our spec, and allow us to ascend out of this rabbit hole.
public static class UserProvider
{
    private static User _user;
    public static User Current => _user ??= new User();
}

public class User
{
    public User()
    {
        var id = new byte[20];
        RandomNumberGenerator.Create().GetBytes(id);
        SessionId = Convert.ToBase64String(id);
    }

    public string SessionId { get; }
}

public class AntiForgeryToken
{
    public static string Secret = "super-secret";

    // HMAC-Based CSRF Token Generation
    // https://cheatsheetseries.owasp.org/cheatsheets/Cross-Site_Request_Forgery_Prevention_Cheat_Sheet.html#hmac-based-token-pattern
    //
    public static string GetForCurrentUser()
    {
        var now = DateTimeOffset.UtcNow.ToUnixTimeSeconds();
        return CreateToken(now.ToString());
    }

    private static string CreateToken(string currentTimeStamp)
    {
        var secretKeyBytes = Encoding.UTF8.GetBytes(Secret);
        var stringToSignBytes = Encoding.UTF8.GetBytes($"{UserProvider.Current.SessionId}{currentTimeStamp}");

        using var hmac = new HMACSHA256(secretKeyBytes);
        var signatureBytes = hmac.ComputeHash(stringToSignBytes);
        return $"{Convert.ToBase64String(signatureBytes)}:{currentTimeStamp}";
    }

    ...
}
Neat side-learning - .NET Core now has a
RandomNumberGeneratorclass which by default exposes aRNGCryptoServiceProviderinstance to work with to generate cryptographically-strong psuedo-random numbers in a cross-platform friendly way!
I’m going to skip the OPTIONAL parameters for the sake of this exercise.
2. Client sends the request to the Authorization Server
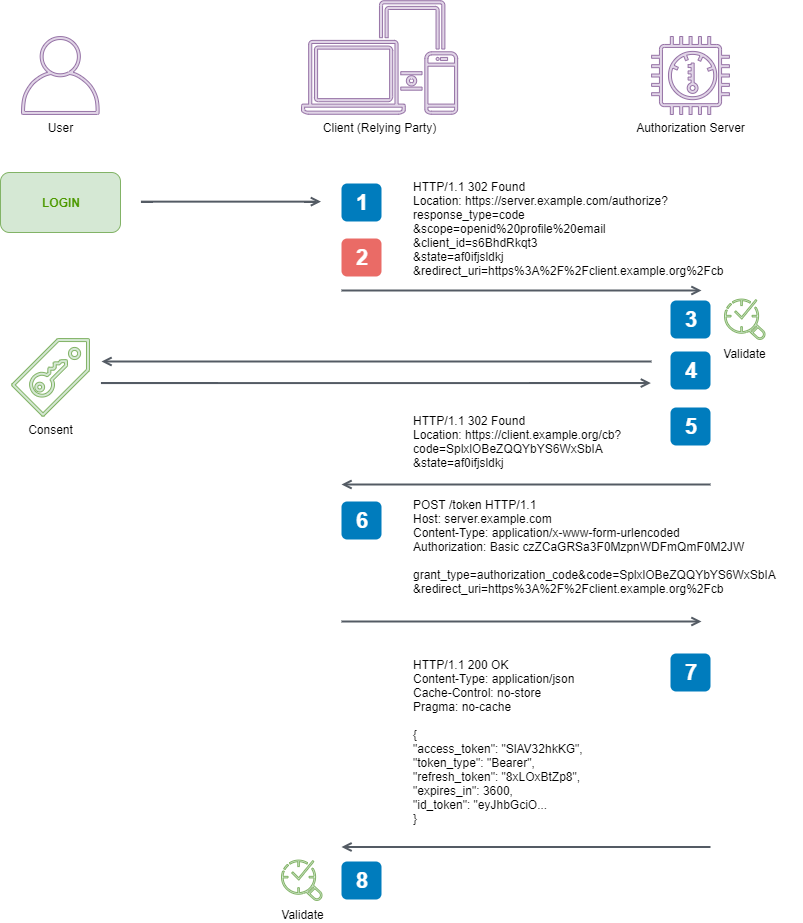
Now it is time to move on to sending the request we spent so much time crafting.
This is reasonably easy, but we do need to remember - the authorization request requires user interaction for this flow, so we can’t just send it server-to-server - the Resource Owner (person using a browser) needs to issue the request via their browser so that they can interact with the Authorization Server. The server will then call our Client application back on the supplied redirect_uri on the query string as described.
3.1.2.1.  Authentication Request
...
redirect_uri
    REQUIRED. Redirection URI to which the response will be sent.
    This URI MUST exactly match one of the Redirection URI values for
    the Client pre-registered at the OpenID Provider, with the matching
    performed as described in Section 6.2.1 of [RFC3986]...
We can accomplish this by issuing a redirect like so
[HttpGet("login")]
public IActionResult Login()
{
    // 3.1.2.  Authorization Endpoint
    const string authorizationEndpoint = "http://localhost:8080/connect/authorize";

    // 3.1.2.1.  Authentication Request
    var requestContent =
        "scope=openid%20profile%20email&" +
        "response_type=code&" +
        "client_id=client&" +
        "redirect_uri=https%3A%2F%2Flocalhost%3A8090%2Fapi%2Fauthorize&" +
        $"state={WebUtility.UrlEncode(AntiForgeryToken.GetForCurrentUser())}";

    return Redirect($"{authorizationEndpoint}?{requestContent}");
}
The key learning here is from this line: This URI MUST exactly match one of the Redirection URI values for the Client pre-registered at the OpenID Provider. This ensures our Authentication Server will only return tokens to a known endpoint configured within it, preventing a range of attacks that could occur otherwise.
Stay tuned for the next installment, in which we will delve into retrieving our Authorization Code, and exchanging that for TOKENS!